1
2
3
4
5
6
7
8
9
10
11
12
13
14
15
16
17
18
19
20
21
22
23
24
25
26
27
28
29
30
31
32
33
34
35
36
37
38
39
40
41
42
43
44
45
46
47
48
49
50
51
52
53
54
55
56
57
58
59
60
61
62
63
64
65
66
67
68
69
70
71
72
73
74
75
76
77
78
79
80
81
82
83
84
85
86
87
88
89
90
91
92
93
94
95
96
97
98
99
100
101
102
103
104
105
106
107
108
109
110
111
112
113
114
115
116
117
118
119
120
121
122
123
124
125
126
127
128
129
130
131
132
133
134
135
136
137
138
139
140
141
142
143
144
145
146
147
148
149
150
151
152
153
154
155
156
157
158
159
160
161
162
163
164
165
166
167
168
169
170
171
172
173
174
175
176
177
178
179
180
181
182
183
184
185
186
187
188
189
190
191
192
193
194
195
196
197
198
199
200
201
202
203
204
205
206
207
208
209
210
211
212
213
214
215
216
217
218
| #配置webdav
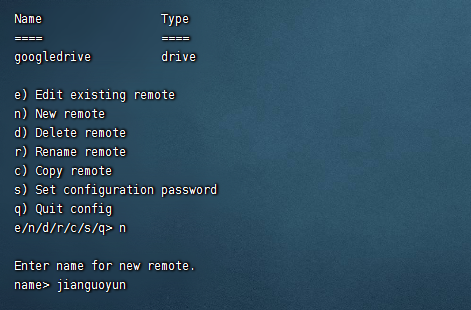
rclone config
#新建
No remotes found - make a new one
n) New remote
s) Set configuration password
q) Quit config
n/s/q> n
name> googledrive
Option Storage.
Type of storage to configure.
Choose a number from below, or type in your own value.
1 / 1Fichier
\ (fichier)
2 / Akamai NetStorage
\ (netstorage)
3 / Alias for an existing remote
\ (alias)
4 / Amazon Drive
\ (amazon cloud drive)
5 / Amazon S3 Compliant Storage Providers including AWS, Alibaba, Ceph, China Mobile, Cloudflare, ArvanCloud, DigitalOcean, Dreamhost, Huawei OBS, IBM COS, IDrive e2, IONOS Cloud, Liara, Lyve Cloud, Minio, Netease, RackCorp, Scaleway, SeaweedFS, StackPath, Storj, Tencent COS, Qiniu and Wasabi
\ (s3)
6 / Backblaze B2
\ (b2)
7 / Better checksums for other remotes
\ (hasher)
8 / Box
\ (box)
9 / Cache a remote
\ (cache)
10 / Citrix Sharefile
\ (sharefile)
11 / Combine several remotes into one
\ (combine)
12 / Compress a remote
\ (compress)
13 / Dropbox
\ (dropbox)
14 / Encrypt/Decrypt a remote
\ (crypt)
15 / Enterprise File Fabric
\ (filefabric)
16 / FTP
\ (ftp)
17 / Google Cloud Storage (this is not Google Drive)
\ (google cloud storage)
18 / Google Drive
\ (drive)
19 / Google Photos
\ (google photos)
20 / HTTP
\ (http)
21 / Hadoop distributed file system
\ (hdfs)
22 / HiDrive
\ (hidrive)
23 / In memory object storage system.
\ (memory)
24 / Internet Archive
\ (internetarchive)
25 / Jottacloud
\ (jottacloud)
26 / Koofr, Digi Storage and other Koofr-compatible storage providers
\ (koofr)
27 / Local Disk
\ (local)
28 / Mail.ru Cloud
\ (mailru)
29 / Mega
\ (mega)
30 / Microsoft Azure Blob Storage
\ (azureblob)
31 / Microsoft OneDrive
\ (onedrive)
32 / OpenDrive
\ (opendrive)
33 / OpenStack Swift (Rackspace Cloud Files, Memset Memstore, OVH)
\ (swift)
34 / Oracle Cloud Infrastructure Object Storage
\ (oracleobjectstorage)
35 / Pcloud
\ (pcloud)
36 / Put.io
\ (putio)
37 / QingCloud Object Storage
\ (qingstor)
38 / SMB / CIFS
\ (smb)
39 / SSH/SFTP
\ (sftp)
40 / Sia Decentralized Cloud
\ (sia)
41 / Storj Decentralized Cloud Storage
\ (storj)
42 / Sugarsync
\ (sugarsync)
43 / Transparently chunk/split large files
\ (chunker)
44 / Union merges the contents of several upstream fs
\ (union)
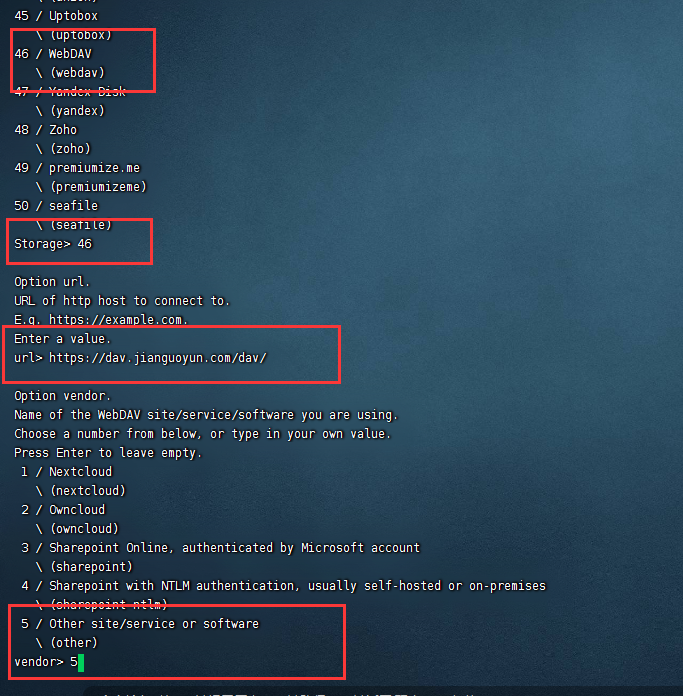
45 / Uptobox
\ (uptobox)
46 / WebDAV
\ (webdav)
47 / Yandex Disk
\ (yandex)
48 / Zoho
\ (zoho)
49 / premiumize.me
\ (premiumizeme)
50 / seafile
\ (seafile)
Storage> 18
Option client_id.
Google Application Client Id
Setting your own is recommended.
See https://rclone.org/drive/#making-your-own-client-id for how to create your own.
If you leave this blank, it will use an internal key which is low performance.
Enter a value. Press Enter to leave empty.
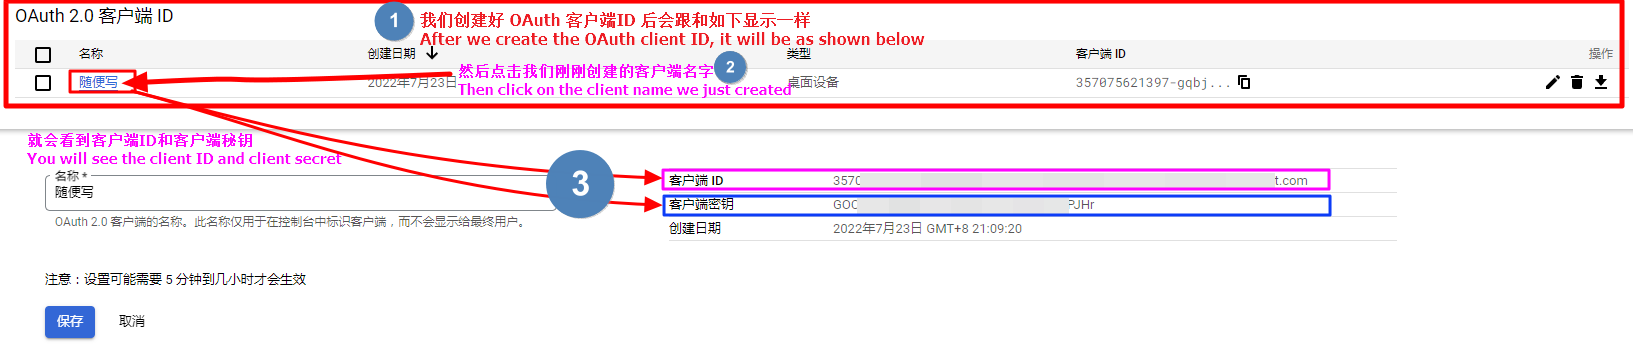
client_id> 你在google 申请的 Client_ID
Option client_secret.
OAuth Client Secret.
Leave blank normally.
Enter a value. Press Enter to leave empty.
client_secret> 你在google 申请的 Client_secre
Option scope.
Scope that rclone should use when requesting access from drive.
Choose a number from below, or type in your own value.
Press Enter to leave empty.
1 / Full access all files, excluding Application Data Folder.
\ (drive)
2 / Read-only access to file metadata and file contents.
\ (drive.readonly)
/ Access to files created by rclone only.
3 | These are visible in the drive website.
| File authorization is revoked when the user deauthorizes the app.
\ (drive.file)
/ Allows read and write access to the Application Data folder.
4 | This is not visible in the drive website.
\ (drive.appfolder)
/ Allows read-only access to file metadata but
5 | does not allow any access to read or download file content.
\ (drive.metadata.readonly)
scope> 1
Option service_account_file.
Service Account Credentials JSON file path.
Leave blank normally.
Needed only if you want use SA instead of interactive login.
Leading `~` will be expanded in the file name as will environment variables such as `${RCLONE_CONFIG_DIR}`.
Enter a value. Press Enter to leave empty.
service_account_file>
Edit advanced config?
y) Yes
n) No (default)
y/n> n
Use web browser to automatically authenticate rclone with remote?
* Say Y if the machine running rclone has a web browser you can use
* Say N if running rclone on a (remote) machine without web browser access
If not sure try Y. If Y failed, try N.
y) Yes (default)
n) No
y/n> n
Option config_token.
For this to work, you will need rclone available on a machine that has
a web browser available.
For more help and alternate methods see: https://rclone.org/remote_setup/
Execute the following on the machine with the web browser (same rclone
version recommended):
rclone authorize "drive" "XXXXXXXXXXXXXXXXXX"
Then paste the result.
Enter a value.
config_token> xxxxxxxxxxxxxxxxxxxxx
Configure this as a Shared Drive (Team Drive)?
y) Yes
n) No (default)
y/n> n # 是否为团队盘 选否
## 检查配置是否正确
Configuration complete.
Options:
- type: drive
- client_id: xxxxxxxxxxxxxxxxx
- client_secret: xxxxxxxxxxxxxxxxx
- scope: drive
- token: {"access_token":"xxxxxxxxxxxxxxxxxx","expiry":"2024-02-15T21:18:39.5036298+08:00"}
- team_drive:
Keep this "googledrive" remote?
y) Yes this is OK (default)
e) Edit this remote
d) Delete this remote
y/e/d>
Current remotes:
Name Type
==== ====
googledrive drive
e) Edit existing remote
n) New remote
d) Delete remote
r) Rename remote
c) Copy remote
s) Set configuration password
q) Quit config
e/n/d/r/c/s/q> q
|